Building a Self Driving car
A few weeks back Elon Musk revealed the second part of his masterplan for Tesla, including self-driving cars and self-driving busses. Cars that can park itself outside the city centre or act like taxi’s, while you’re at work. Probably, the technical innovation isn’t the main bottleneck in the development of self-driving cars, it’s society’s attitude towards it. People are wired by nature to resist change and are reluctant to adapt when they’ve got no control over it, even though it might improve their lives. A few weeks back, a Tesla car drove into a truck, thereby killing the passenger. Adversaries use this accident as an argument not to change. Tesla’s reaction was that it took 130 million auto-pilot miles before a lethal accident, while the US average is 94 million miles, making it actually immoral not to “drive” a self-driving car.
In my quest of the argument that technical innovation isn’t the bottleneck, I wanted to build my own self driving car. My equivalent of Elon’s Masterplan. Our Lab is the perfect place to figure out whether it’s possible, as it is for projects which have their foundation in curiosity and intrinsic motivation. In this article I’ll describe how I managed to build my own self driving car.
Hacking a car
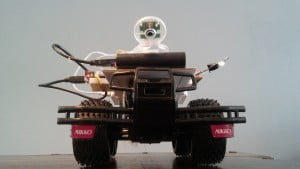
First thing I needed was a car, I don’t think my boss would appreciate it if I were to hack my company car for this project, so I first decided to try it on a smaller scale. My younger brother got an RC car for his birthday about fifteen years ago, he was kind of to let me break it apart. Second thing I needed was a computer which I could connect to the car, I chose a Raspberry PI 2 as it’s cheap and small enough to fit on top of the car. With some trial and error I managed to reverse engineer the electrical circuits of the remote control and wired the Raspberry PI onto it. Had to dig deep into my memory for this, the last time I soldered was my first year in high school.
Attached to the Raspberry is also a camera, which is mounted at the front of the car, looking at the road ahead. The camera is the “eye” of the car, the idea is that the camera takes a picture of the road and that an algorithm figures out which direction the car needs to go.


Learning the car to drive
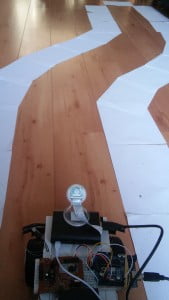
In my living room I set out a “road” using a bunch A4 papers being the sides of the road. At this point, I need to apologize to my roommate, who was forced to live in a house for a while with road running through the living room.

When the car drives on the road, it needs to decide whether to go left, right, forward or whether it needs to stop. The car constantly needs to make this decision. Before each decision the car takes a photo of the road. Our camera was set to take black and white photos of 50 by 50 pixels. A photo is actually just a bunch of data, every pixel has a certain value indicating the “whiteness” of the pixel, and with data we can do a bunch of stuff.
As, I wanted to learn the algorithm on the Raspberry Pi (and not on a more powerful computer), the first thing I wanted to do is reduce the number of pixels at which the car needs to look at. There’s a certain technique, called Feature Selection, which looks at which values are important in order to predict something. The following picture displays at which pixels the car is going to look in order to determine the next action the car has to take, on the left you see the pictures the car takes and on the right to which pixels the car looks. These are 370 instead of 2 500. You can see that most pixels are in the upper right or upper left corner. This makes quite some sense; if the side of the road appears in the upper right corner for example, the car needs to go left.
The final step is to build an algorithm that translates these data into patterns. The algorithm distinguishes, for each of the four actions, combinations of pixels that are white versus black. These patterns can be seen as the key between the photo and the action to take. Personally, this part was probably the most easy part to do, as we use this technique for all kinds of different projects.
Letting the car drive itself
Now we’ve taught the car how to drive, it’s time to set it free. After just five or six times driving car by hand, it was able to find its own way. In the small movie you see it drives a bit jerky, after each action it stops for a small moment. This is due to two reasons, first it needs to take a photo of the road ahead. If the car is in movement, the photo won’t be sharp; it’s like when you move your phone too much when you’re taking your selfie. If the photo is blurred, the algorithm will be less accurate. The second reason is that the algorithm needs some time; take a photo, process the data, predict the next decision and tell the car what to do. We’re asking quite a lot from a small computer.
It’s not perfect, but it’s at the stage where it can drive itself and keep learning if I correct it when it goes to the wrong direction. In other words, while driving, it learns to drive. Letting computers learn from experience, is called Machine Learning. Machine Learning is used more and more these days, for a wide range of different purposes. Here at Cmotions and The Analytics Lab we use Machine Learning techniques mainly to predict customer behaviour. We try to tackle questions like when is this particular customer going to end his subscription, who is likely to buy a certain product or which product suits the individual’s need the best? In this way, we facilitate companies to move from one-to-many approaches to one-to-one.
So, now what? Well step up the game and ask my boss if I can hack my company car, so that it can drive me from and to work while I check my email in the passenger seat or drive me home when I’ve had one too many. Maybe that’s a bit too ambitious for now, but I might program it in such a way that it gets a few beers from the fridge on Friday afternoons.
If you’ve got any questions, don’t hesitate to contact me. And if you have a 3d printer, definitely contact me. The car is still a cabrio and is looking for a roof, who can print me one?

