Fine-Tuning a Video Classification Model for Hand Sign Recognition in Python
Data Science is an ever-evolving field, and we at Cmotions are always ready to evolve with it. Each year, we select a project that pushes our boundaries—preferably by exploring a new skill, addressing a relevant societal issue, and simply engaging in a fun team challenge. This year, we set out to tackle AI video models, specifically focusing on translating (WLASL) sign language into spoken words. This project has yet again been a fantastic opportunity to work collaboratively, learn from one another, and have fun along the way. Do you want to read more about the outline of the project, read our other article. In this article we will focus more on the Python code and more specifically on the changes we made to make it work for our project. You can check out the Python code we developed on our Gitlab repository. In the following sections, we’ll dive into the model and training approach that brought our project to life.
- The data: WLASL
When starting to work on this project we first had to find suitable data, fit for our project and preferably also well known within the world of hand sign language. This search has led us to the WLASL dataset, which contains over 2000 glosses with multiple videos. In sign language, a gloss is a way to represent a sign with a word, like writing “thank you” to describe the hand gesture for saying thank you. Since the WLASL dataset provided us with 2000 of these glosses, we already had a large amount of labeled training data to start off with.
To make this data suitable for our project, we first restructured the way the files were stored. We needed them to be organized into separate train and test folders, with each containing subfolders for individual glosses. Each subfolder held the corresponding videos for that gloss. Since the dataset included a JSON overview of the files, we were able to efficiently reorganize them using simple Python code.
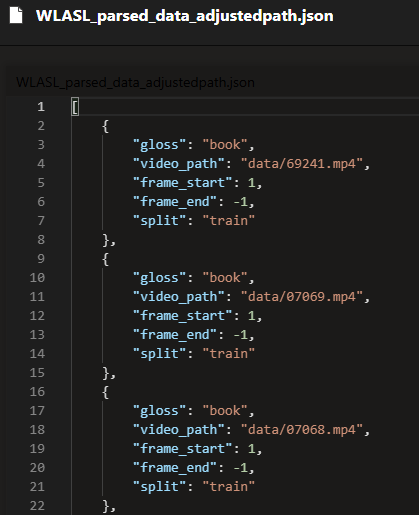
Here you can see the json we used as input:
And the Python code we used to restructure the files:
import os
import shutil
import json

# Load the JSON data
with open('WLASL_parsed_data_adjustedpath.json', 'r') as f:
    data = json.load(f)

# Base directory where the new folders will be created
base_dir = 'data'
moved_files = 0
missing_files = 0

for item in data:
    # Get the current path to the video
    current_path = item['video_path']

    # Check if the file exists before taking the next steps
    if os.path.exists(current_path):

        # Get the split (train/test/val) and gloss (label) from the JSON item
        split = item['split']
        gloss = item['gloss']

        # Create the split and gloss directories if they don't exist
        split_dir = os.path.join(base_dir, split)
        os.makedirs(split_dir, exist_ok=True)
        gloss_dir = os.path.join(split_dir, gloss)
        os.makedirs(gloss_dir, exist_ok=True)

        # Create the new path of the video
        new_path = os.path.join(gloss_dir, os.path.basename(current_path))

        # Move the video to the new directory
        shutil.move(current_path, new_path)

        moved_files += 1

        print(f"the video {current_path} is moved to {new_path}")
    else:
        missing_files += 1
        print(f"the video {current_path} does not exist")

print(f"Moved {moved_files} files and {missing_files} files are missing")
Code snippet 1: Restructure WLASL data files
When this was done, the last step we took in preparing the data was to select a subset of 29 glosses to focus our training on.
2. The model: VideoMAE
Our efforts on building a model that is capable of understanding hand sign language starts with a pretrained model: VideoMAE. This is a state-of-the-art self-supervised video pre-training model that excels at learning spatial and temporal representations from video data. Unlike traditional models that rely heavily on labeled datasets, VideoMAE uses a high masking ratio during training, enabling it to learn from vast amounts of unlabeled video footage. This makes it particularly effective for video-based tasks requiring motion understanding, so it seems like a perfect fit for our hand sign usecase. Luckily enough, the developers of the model also shared example scripts on Huggingface, helping us to hit the ground running.
Hand sign recognition relies on capturing both static hand postures and dynamic transitions between gestures—an area where VideoMAE excels due to its strong motion-centric attention mechanisms. By fine-tuning VideoMAE with a labeled hand sign dataset, we can significantly improve model accuracy while reducing the need for extensive labeled training data. In our view, this makes it a powerful and practical choice for a real-world issue in gesture-based communication and accessibility.
3. Training: eyes on the target
Training a model on hand signs means that we want to focus the weights in the neural network on the hands and face and not on the colors in the video or other (static) objects that are visible. During our first epochs, we found that the model was learning extremely fast on the training dataset but the loss on the test dataset was not dropping as we expected. We suspect that the model converged on the colors in the background, or the type of person that was making the hand sign. To overcome this, we had to introduce quite some noise in the original videos to force the model to focus on the hand movements. We used the following torch vision transformations and augmentations:
- RandomHorizontalFlip: flip the videoframe horizontally, like looking in a mirror;
- RandomRotation: randomly rotate a video frame by a specified angle;
- RandomAutocontrast: auto adjust the contrast the pixels of a video frame with a given probability;
- RandomInvert: random invert the color of pixels in a video frame;
- RandomGrayscale: randomly convert a frame to grayscale with a probability;
- ElasticTransform: transform a video frame with an elastic transformation, a sort of stretch;
- RandomInvert: invert the colors of a video frame with a probability;
- RandomDistortion: add random noise in a videoframe by altering the original tensor with a minimum and maximum value.
Transformations are done on a random sample of all video frames of a video that are fed to the model as input to train on. So, some frames are kept as original, and they are augmented on one or more of the options above. We have tried different settings to see how the model would behave, specifically if we would see an evaluation loss across all glosses.
train_transform = Compose(
    [
        ApplyTransformToKey(
            key="video",
            transform=Compose(
                [
                    # same arguments as test set
                    UniformTemporalSubsample(num_frames_to_sample),
                    Lambda(lambda x: x / 255.0),
                    Normalize(mean, std),
                    Resize(resize_to, antialias=True),

                    # additional noise to avoid overfitting
                    RandomHorizontalFlip(p=0.4),
                    RandomRotation(degrees=10),
                    ElasticTransform(alpha=30.0),
                    AddDistortion(0.1),

                    # Use generalized RandomTransformCustom for both RandomInvert and RandomAutocontrast
                    RandomTransformCustom(RandomAutocontrast(p=1.0), p=0.2),
                    RandomTransformCustom(RandomInvert(p=1.0), p=0.3),
                ]
            ),
        ),
    ]
)
Code snippet 2: Add Random transformations in train videos
All transformations are functions of TorchVideo, except for AddDistortion. This custom PyTorch module adds a constant random “shift” (noise) to every pixel in a video tensor. Generally, it offsets the entire video by a single random value each time the forward pass is called. We observed that excessive distortion makes it difficult for the model to converge. A probability of 10% produced the best results.
class AddDistortion(torch.nn.Module):
    """
    Adds distortion to a video.
    """
    def __init__(self, distortion=0.5):
        super().__init__()
        self.distortion = distortion
    def forward(self, x: torch.Tensor) -> torch.Tensor:
        assert len(x.shape) == 4, "video must have shape (C, T, H, W)"
        # Create a new tensor with the same shape as x, filled with random values
        random_values = torch.rand_like(x) * 0 + np.random.normal(0, self.distortion)
        # Add the random values to x
        x = x + random_values
        return x
Code snippet 3: Add Distortion in train videos
The result is a random set of frames which is transformed for all training video’s.
4. Conclusion
When looking at this article, you might think “Wow, that was easy, how could they have possibly spent so much time on doing this….” We get that, but it has not been easy at all, you must take our word for this. We have ploughed through many advanced code scripts and theoretical articles on video classification to get a sense of what is important and what would suit our use case. When finding the VideoMAE model and example scripts, it really felt like a little breakthrough. But of course, this led us to the next challenge: what helps the model learn as efficiently as possible and what limitations does the model have that we must consider.
Frames
As far as limitations go, the biggest one was the fact that the model uses a fixed number of frames from the video (16), which is embedded in the architecture of the model and thus is not something we were even thinking about changing. But it is something to be aware of, especially when deciding on how to pick these frames: random, with fixed intervals, etc.
Distortion
Then, when you have decided on how to pick the frames, the next question is distortion… What options do we have to pick from, how does each option affect the frames and, most importantly, how do we make sure the core of the video – the gesture – stays intact while playing around with all the other aspects. This took us a lot of experimenting and playing around with the different options. The result is amazingly simple, but do not let those few lines of code deceive you into thinking it was easy to create them.
Finetuning settings
Then we get to think about all the training parameters. We all know, there is no way to deduce what the “best” settings are. But we also know that when working with this type of model and data, we also do not have the compute resources to endlessly experiment with that. So, we had “thoughtfully experiment” with the settings, based on what the results we saw when just running a small number of epochs. Are the settings we ended up with the perfect settings? Maybe. Probably not. But that is something we have to deal with in our day-to-day work as well. We try to approach this from the theory as much as we can and mix this knowledge with our own experience and some experimenting until we feel comfortable with the results the model gives us.
Model performance
Ok, talking about results. How well did our model perform in the end when it comes to classifying our 29 glosses? Well, the evaluation results (which can be found in the notebook on Gitlab) reflect a highly effective model, achieving a 98.25% accuracy and a 98.32% F1 score. Next to the overall accuracy we also zoomed in on the precision and recall for each gloss. Most glosses have perfect precision and recall, indicating reliable predictions, especially for signs like “hello,” “tea,” and “work.” However, “thank you” showed weaker precision and recall, suggesting the model struggles with this sign. Overall, the model performs well BUT to evaluate its performance, we would have to use videos from the real world or other WLASL datasets. Because that is where the challenge lies of course.


